Write Advanced AI Prompts!*
Mastering Prompts: From Casual Writing to Professional Prompt Engineering
In the world of large language models like Grok, ChatGPT, and Claude, the quality of your results depends far more on the prompt than most people realize.
Most users simply write a quick request and hope for the best. That is basic prompt writing. Professional prompt engineering is something entirely different — and far more powerful.
Writing a prompt is casual and one-and-done. You type a request and accept whatever comes back.
Prompt engineering is deliberate and systematic. You design, test, and refine your instructions to get the best possible output consistently. It is the difference between getting an acceptable answer and getting an exceptional one.
| Aspect | Writing a Prompt | Prompt Engineering |
|---|---|---|
| Goal | Get any answer | Get the optimal answer |
| Effort | Seconds | Minutes to hours of refinement |
| Consistency | Often inconsistent | Highly consistent and reliable |
| Skill required | None | Understanding how LLMs work |
The gap between the two approaches is significant. Here are the essential building blocks that separate good prompts from truly effective ones.
Context: Give the AI the Full Picture (The Foundation)
Context is the single most important building block. Without it, the model has to guess your intent, background knowledge, audience, tone, and constraints. Rich context dramatically reduces ambiguity and hallucinations.
Define the scenario, your role or the AI’s persona, the target audience, any domain-specific knowledge, and success criteria. Include relevant background facts, constraints (time, budget, legal, ethical), and what “good” looks like.
Expanded example:
Instead of “Explain quantum computing,” use:
“You are a world-class physics professor teaching a class of curious high-school students who have never studied physics beyond basic algebra. The students are 15–17 years old and primarily interested in real-world applications rather than heavy math. Explain quantum computing…”
Pro tip: Front-load context early in the prompt. The more specific and layered the context, the more grounded and creative the output becomes.
Sequence: Order Matters More Than You Think (The Flow)
Large language models attend to the entire prompt, but the order of information still strongly influences the final result (later instructions often carry more weight). Place the most critical instructions last — they carry the heaviest weight.
Start with persona/role. Follow with full context. Then state the exact task. End with output format, constraints, and any final checks. Use numbered steps for complex tasks so the model follows your logic exactly.
Expanded example (multi-step workflow):
- Analyze the user’s request.
- Check against all guardrails listed below.
- If it passes, generate the response using chain-of-thought reasoning.
- Finally, format the output exactly as specified.
Pro tip: Think of sequence like a recipe: ingredients first, then step-by-step instructions, then plating rules. This prevents the model from “forgetting” early constraints.
Gates: Decision Points and Conditional Logic (The Checkpoints)
Gates are if-then branches that force the model to evaluate conditions before proceeding. They add reliability and prevent unwanted behavior early in the reasoning process.
Create explicit decision points at the start or between major steps. Use clear language such as “First, determine whether…” or “If X is true, then Y; otherwise Z.”
Expanded example:
“First, determine whether the user’s request involves any prohibited topics (list them here). If yes, respond only with ‘I cannot assist with that request.’ If no, proceed to step 2 and generate the content.”
Pro tip: Gates are gold for customer-service bots, content moderators, or any high-stakes workflow where you need the AI to “think before acting.”
Guardrails: Safety Nets and Output Constraints (The Boundaries)
Guardrails are explicit positive and negative rules that keep the AI strictly on track. They are your primary defense against drift, hallucinations, and off-brand responses.
Positive guardrails tell the model what it must do. Negative guardrails tell it what it must never do. Make them specific and measurable.
Expanded example set:
- Never fabricate statistics or citations. If unsure, say “I would need to verify that.”
- Always maintain a professional yet approachable tone.
- Maximum 180 words total.
- End every response with a clear call-to-action.
- Prohibit any mention of competitors.
Pro tip: List guardrails in a dedicated bullet block so the model can reference them easily. Re-state them periodically in long conversations.
Advanced Prompt Engineering Techniques (The Power Tools)
Beyond the core building blocks, several proven techniques can dramatically improve the quality, consistency, and intelligence of the AI’s responses.
Role-Playing and Persona Assignment
Assigning a clear, specific persona to the AI is one of the simplest yet most powerful techniques.
Example: “You are a world-class direct-response copywriter who has written winning campaigns for Apple and Nike. You are persuasive but never pushy.”
This technique consistently improves tone, depth of knowledge, and creativity.
The Power of Examples: Few-Shot Prompting
Few-shot prompting is one of the highest-leverage techniques in prompt engineering. Instead of only telling the model what to do, you show it several high-quality examples of the desired input and output.
Why examples are so valuable:
- The model learns the pattern, style, reasoning depth, tone, and structure directly from the examples (this is called in-context learning).
- Examples are often far more effective than even the most detailed written instructions.
- They greatly reduce ambiguity, misinterpretation, and hallucinations.
- In practice and research, well-chosen examples can boost performance on complex tasks by 30–50% or more compared to zero-shot prompting (results vary by task).
Best practices:
- Use 2–5 carefully crafted examples (3 is often the sweet spot).
- Make the examples as similar as possible to the real task you want completed.
- Include both the user input and the ideal response for each example.
- Place the examples immediately before your actual request.
Mini example (Few-Shot):
Here are two examples of the style and format I want:
Input: “Write a product description for wireless earbuds.”
Output: [perfect example output here]
Input: “Write a product description for a smartwatch.”
Output: [second perfect example output here]
Now, for the following new input, produce the output in exactly the same style: [your real request]
Pro tip: Always make your examples the highest possible quality — they set the standard the model will try to match.
Chain-of-Thought (CoT) Prompting
Instruct the model to “think step by step” before giving the final answer. This simple phrase unlocks much better reasoning on math, logic, analysis, and multi-step problems.
Delimiters and Clear Structure
Delimiters are special markers that clearly separate different sections of your prompt. They act as visual and structural boundaries, helping the model distinguish between instructions, context, examples, user input, and output requirements.
Common types of delimiters:
- Triple Quotes (
"""or'''): Excellent for enclosing large blocks of text or user-provided content. - XML-style Tags: One of the most effective and reliable methods (
<instructions>,<examples>,<data>,<output>). - Markdown Separators: Lines such as
---,===, or***for simple visual breaks.
Practical Examples:
Example 1: Triple Quotes
You are a professional editor.
Summarize the following article in 4 bullet points.
"""
[Long article text goes here]
"""
Example 2: XML-style Tags
<role>You are an expert financial analyst.</role>
<task>
Analyze the quarterly sales data below and identify the top 3 insights.
</task>
<data>
[paste sales data here]
</data> <output_requirements> Use Markdown tables and keep the response under 300 words. </output_requirements>
Example 3: Markdown Separators
You are a creative writing coach.
---
INSTRUCTIONS
Help the user improve the following story opening. Focus on pacing and vivid descriptions.
---
STORY OPENING
Once upon a time...
Pro tip: XML-style tags tend to work best for very complex or multi-part prompts, while triple quotes are great for cleanly isolating large user content. (Claude users in particular often see the strongest results with XML-style tags.)
Self-Critique and Reflection
Ask the model to evaluate its own output:
“After writing your response, critique it for accuracy, completeness, and adherence to all instructions. Then provide an improved final version.”
Code Inclusion and Code Generation (Advanced)
One of the most powerful applications of prompt engineering involves working with programming code.
You can paste existing code into your prompt so the AI can analyze, explain, debug, optimize, or refactor it. You can also ask the AI to generate new, functional code from a natural-language description.
Popular languages include Python (the most common), R (especially for statistics and data science), JavaScript, SQL, and many others.
Key tips for success:
- Always specify the exact language and version (e.g., “Python 3.11” or “R 4.3”).
- When including code in the prompt, use fenced code blocks with the correct language tag (e.g. “`python
- Be highly specific about requirements: libraries to use, coding style, performance needs, error handling, and documentation/comments.
Important note: Working with code in prompts (both inclusion and generation) is considered an advanced topic in prompt engineering. It delivers the best results when you have strong prompting skills combined with a good understanding of the programming language and the problem you are trying to solve.
Output Formatting: Markdown, Code Blocks, and Presentation-Friendly Formats (The Polish)
Specifying exactly how the output should be formatted is one of the highest-leverage techniques in prompt engineering. It turns good content into professional, scannable, and immediately usable material with almost no extra effort on your part.
Explicitly tell the model the desired format at the end of the prompt (where it has the most influence). Use clean Markdown. Apply specific heading levels. Use bullet points or numbered lists. Present data in tables. Use code blocks with proper language tags.
Expanded example:
“Format your entire response using clean, professional Markdown. Use ## for main sections and ### for subsections. Present all lists as bullets or numbered steps. Use code blocks with the appropriate language tag for any code, JSON, or data. Include a comparison table where relevant. Make the output scannable and ready to copy directly into a document, blog post, or slide deck.”
Pro tip: For maximum polish, add: “Make this response presentation-friendly and suitable for a client report or slide deck.” Always place formatting instructions near the very end of your prompt so they carry the strongest weight.
The Dark Side of Iteration: Hallucinations, Context Drift, and How to Fix It
Hallucination occurs when an LLM generates plausible-sounding information that is factually incorrect, invented, or not grounded in its training data. The model isn’t lying on purpose — it is simply completing patterns.
Context drift happens every time you iterate inside the same conversation. Original instructions, context, and guardrails become diluted or buried under newer messages. This drift dramatically increases the chance of hallucinations.
How to Mitigate Context Drift: The Master Prompt Reset
Context drift can be effectively mitigated by periodically asking the model for a clean, complete, self-contained revision (often called a “master prompt”). This technique acts like hitting a reset button: it compresses everything important into a single, high-signal block of text that you copy-paste into a brand-new chat.
Exact prompt you can copy and reuse:
Please create a clean, complete, self-contained master prompt that captures our entire discussion so far.
Include:
- My exact goal and desired outcome
- All context and background I provided
- Every guardrail, gate, and constraint we agreed on
- The persona/role you are playing
- Any style, length, or formatting rules
- The 2–3 best examples we refined (if any)
Output ONLY the master prompt itself — nothing else. Make it ready to copy-paste into a new chat as the very first message. Preserve all original wording and intent without summarizing or paraphrasing my instructions. Use clear headings and bullet points inside the prompt so it is easy to read and follow.
Pro tips for maximum effectiveness:
- Do this reset every 8–15 turns (or whenever answers start feeling slightly off-track).
- Add a confidence check: “Also rate how confident you are (0–100) that this master prompt fully preserves our intent.”
- Version the master prompts (v1, v2, etc.) and keep them in a separate document.
- For long-term projects, treat the latest master prompt as your single source of truth.
Ultimate Prompt Template
Use this battle-tested template structure as your foundation when crafting high-performance prompts. Copy it and fill in the brackets with your own content.
You are [specific, high-expertise persona/role with relevant credentials].
[Provide rich, detailed context and background information here. Include target audience, scenario, and any important facts.]
Your task is to [clearly state the exact goal or deliverable].
[Optional: Gates / Decision Logic]
First, [define any conditions or decision points].
Strictly follow these guardrails:
- [Guardrail 1]
- [Guardrail 2]
- [Guardrail 3]
- ...
[Optional: Few-shot examples]
Here are examples of the expected output style and quality:
Example 1:
Input: [example input]
Output: [ideal output]
Example 2:
Input: [example input]
Output: [ideal output]
Think step by step before providing your final response.
Format your final output using clean professional Markdown. Use ## for main sections, bullet points or numbered lists where appropriate, and code blocks when needed. Make the response scannable and ready to use.
Final Thought
Prompt writing is something anyone can do in seconds. Prompt engineering is a skill that rewards patience, structure, and continuous testing.
Master the building blocks above — context, sequence, gates, guardrails, advanced techniques, output formatting, and the master-prompt reset — and you will turn large language models from occasionally helpful tools into consistently powerful collaborators.
The difference is not magic. It is engineering.
Now go build something better.
*This article was researched and composed with the help of GROK AI!
AI “Explainer” Videos
Did you try the Grok or Gemini prompt at the end of the last post on “AI Generated Infographics“? Did you compare the output of the two different AI services? If so, you probably noticed slight differences in the results.
This happens because even a well-crafted prompt still gives the AI a bit of freedom in a few critical areas, including:
- Data Sources – Whether it relies on primary data or supplements it with multiple sources.
- Calculation Methods – How it determines each daily data point. The AI might simply take the last (closing) value of the day, or it might use one of several averaging techniques to create a representative daily figure.
If you spotted these small variations from identical prompts, you’re seeing a perfect example of the difference between casual prompting and the rigorous prompt engineering we covered in our earlier article, Advanced AI Prompts.differences between casual prompts and the rigorous prompt engineering described in the earlier “Advanced AI Prompts” article!
Now, let’s add another “power tool” to our AI toolkit.
Take a look at this video produced with HeyGen.ai. While AI avatars can still have subtle “tells” that reveal a digital hand behind the scenes, they are becoming incredibly popular thanks to several clear advantages:
- Scripts are read exactly as written — no editing needed for speech patterns or unnatural behaviors.
- Fully automated production — once the script is ready, the video is generated automatically. The AI can even help refine the script from your initial draft or core idea.
- No studio required — skip the set, quiet recording room, special lighting, and all the usual production hassle.
Here is our HeyGen.ai avatar presenting the same “Sharpe Ratio” information from the last article on “AI Generated Infographics“:
For Education Only! Not Investment Advice!
*This article was researched and composed with the help of GROK AI!
*The Infographics were generated in a two step process. A Draft graphic in Grok was refined into the Infographic in this article by Google’s Gemini Pro.
The Power Of AI Generated Infographics*
For Education Only! Not Investment Advice!
The Power of AI-Generated Visuals: Demystifying the Sharpe Ratio
One very useful benefit of AI is its ability to generate powerful visuals that explain complex technical ideas and relationships. Every organization needs to master, share, teach and sustain the knowledge of their particular industry. Ask your AI to create an “Infographic” and watch it turn dry numbers into compelling, easy-to-understand stories.
Don’t be intimidated by the detailed information in these visual aids. Think of them as “reference cards” for the concepts that they present.
Look at these three excellent sample infographics explaining an important concept in investing: the Sharpe Ratio.
The Sharpe Ratio
The Sharpe Ratio, developed by Nobel laureate William F. Sharpe, is a powerful tool that measures an investment’s risk-adjusted performance. It answers a simple but crucial question: Are the extra returns you’re earning worth the additional risk you’re taking?
This “signal to noise” formula is:
\text{Sharpe Ratio} = \frac{\text{Portfolio Return} - \text{Risk-Free Rate}}{\text{Standard Deviation of Portfolio's Excess Return}}A higher Sharpe Ratio means better compensation per unit of risk. A ratio of zero means you’re not being rewarded for the volatility you’re taking, while negative values signal outright destruction of value relative to a risk-free asset like Treasury bills.
** Note that these formulas are backward looking, not projections of future behavior **
AI has the remarkable ability to transform this abstract formula into crystal-clear, instantly understandable stories. Here are three excellent AI-generated examples:
Figure 1: Sharpe Ratio Comparison – Risk-Adjusted Performance
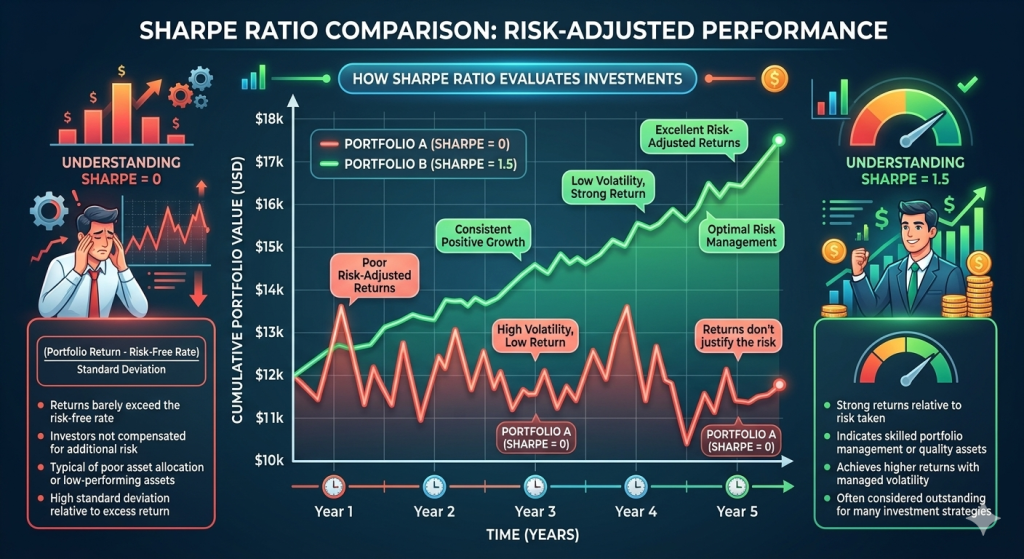
This first visual compares two hypothetical portfolios over five years. Portfolio A (Sharpe = 0, shown in red) zigzags wildly with frequent drawdowns, delivering returns that barely exceed the risk-free rate — classic “poor risk-adjusted returns.” Portfolio B (Sharpe = 1.5, shown in green) climbs steadily with far less volatility, featuring labels such as “Consistent Positive Growth,” “Low Volatility, Strong Return,” and “Excellent Risk-Adjusted Returns.” The side panels reinforce the lesson: a Sharpe of 0 means investors are not being compensated for risk, while a Sharpe of 1.5 signals skilled portfolio management and quality assets that achieve higher returns with controlled volatility.
Figure 2: The Sharpe Ratio – Your Measure of Performance Consistency
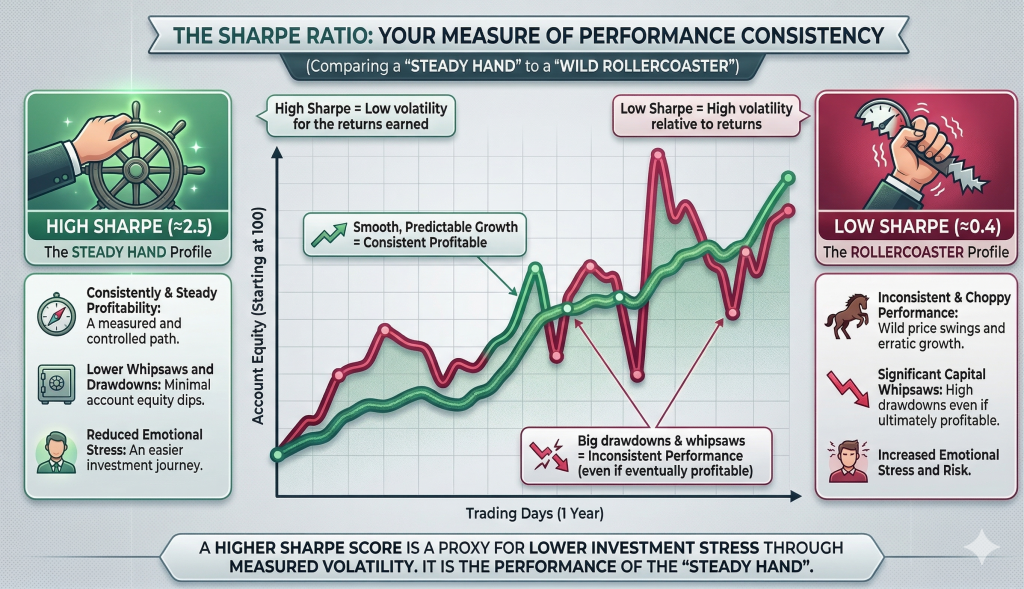
The second infographic shifts the focus from raw numbers to the emotional reality of investing. It contrasts the “Steady Hand” profile (High Sharpe ≈ 2.5) against the “Rollercoaster” profile (Low Sharpe ≈ 0.4). The green line shows smooth, predictable growth with minimal drawdowns and reduced emotional stress. The red line whipsaws with big drawdowns, erratic swings, and high stress — even when it eventually ends up profitable. The takeaway is clear: a higher Sharpe Ratio is a proxy for lower investment stress through measured volatility. It represents the performance of the “Steady Hand.”
Figure 3: The Sharpe Ratio Performance Scorecard
This is a custom normalization for visualization purposes, not a standard financial metric.
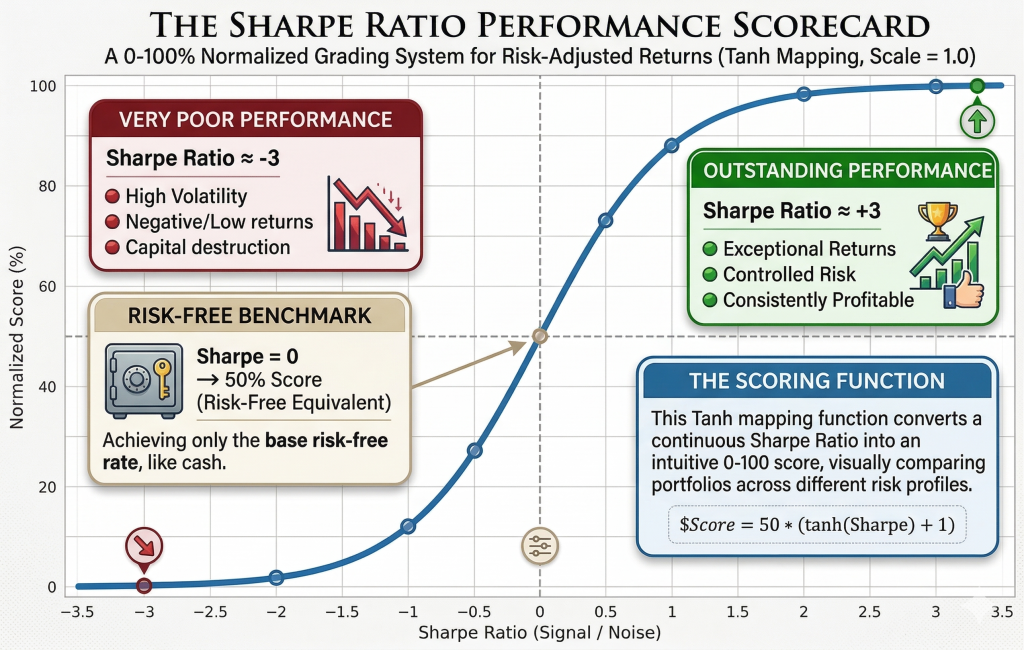
The third visual takes the concept one step further by converting any Sharpe Ratio into an intuitive 0–100 normalized score using a tanh mapping function:
\text{Score} = 50 \times (\tanh(\text{Sharpe}) + 1)On the left, a Sharpe of ≈ –3 earns a “Very Poor Performance” score near 0% — high volatility, negative returns, and capital destruction. At Sharpe = 0 the score is exactly 50% — the risk-free benchmark. On the right, a Sharpe of ≈ +3 pushes the score toward 100% — “Outstanding Performance” with exceptional returns, controlled risk, and consistent profitability. The smooth S-curve makes it instantly obvious where any portfolio lands on the spectrum.
Summary
These three visuals — generated in seconds by AI — turn a single mathematical ratio into a compelling narrative that anyone can grasp. They don’t just show data; they tell a powerful story about risk, reward, consistency, and peace of mind.
Of course, the Sharpe Ratio is not the only factor in making investment decisions. High-risk, high-reward ventures — such as disruptive startups and breakthrough technologies — often produce lower Sharpe scores due to their higher volatility. However, they also carry the potential to transform existing industries and create entirely new markets that were previously unimaginable.
In a world flooded with financial noise, AI’s ability to create such precise, beautiful, and educational graphics is more than a convenience — it’s a genuine superpower for clearer thinking and better investing decisions.
Exercise:
Upload these three images to Grok, Gemini, or your favorite LLM and ask:
“Compare Sharpe ratios of S&P 500 and NASDAQ 100 over one, three and five years. Use daily data. Use 3-month treasury as the risk-free rate. summarize the results in a concise table. Document the table with a footnote showing the start and end date for the five year data.”
Hint: You may be surprised by which index shows the better risk-adjusted performance over the last five years! There will also be slightly different answers between Grok, Gemini, ChatGPT.
For Education Only! Not Investment Advice!
*This article was researched and composed with the help of GROK AI!
*The Infographics were generated in a two step process. A Draft graphic in Grok was refined into the Infographic in this article by Google’s Gemini Pro.
eMail: Business.Services@oiweb.net